A Recurrent Neural Networks Primer - The PyTorch Code
Recurrent Neural Networks - PyTorch Code
These days, PyTorch is the go-to library for deep learning. It handles a lot of the heavy lifting that we did by hand earlier. For instance, autograd. With autograd, the library automatically does the differentiation. To be honest, it feels a bit like cheating.
Let’s take a look at the same RNN using PyTorch instead. The code can be found here. We’ll skim over the parts that are the same from our earlier numpy implementation.
import numpy as np
import matplotlib.pyplot as plt

import torch
from torch.nn import RNNCell, Linear, Sequential, HuberLoss, Flatten, Module

# Configuration
## RNN definition
### maximum length of sequence
T = 6
### hidden state vector dimension
hidden_dim = 32
### output length
output_dim = 8


## training params
### cutoff for linear gradient
alpha = 0.025

### learning rate
eps = 1e-1
### number of training epochs
n_epochs = 20000
### number of samples to reserve for test
test_set_size = 4
### number of samples to generate
n_samples = 128
We’re going ot use the same params as previously. THe only difference here are the imports (which could be simplified by just importing torch.nn instead.)
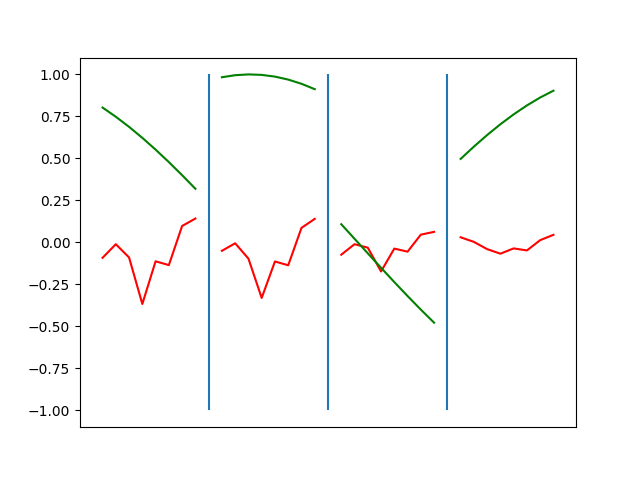
def plot_tests(step):
    v_lines = []
    y_hats = predict_test_set(model)
    for plot_i, (y_hat, ys) in enumerate(zip(y_hats.cpu().numpy(), y_test.cpu().numpy())):
        x = x_grid[:output_dim] + dx_grid*(output_dim + 1)*plot_i
        v_lines.append(dx_grid*(output_dim + 1)*plot_i - dx_grid)
        plt.plot(x, y_hat, "r")
        plt.plot(x, ys, "g")
    for x_pos in v_lines[1:]:
        plt.vlines(x_pos, -1, 1)
    frame1 = plt.gca()
    frame1.axes.get_xaxis().set_ticks([])
    frame1.set_ylim([-1.1,1.1])
    plt.savefig(f"step_plots/{step:06d}.png", format='png')
    plt.clf()
    # Use this to create gif from pngs: convert -delay 10 -loop 1 step_plots/*.png rnn_optimization_pytorch.gif

# set up training data:
#      let's use sin as out target method.
x_grid = np.linspace(0, 4 * np.pi, num=n_samples + test_set_size + T + output_dim)
dx_grid = x_grid[1] - x_grid[0]
sin_wave = np.sin(x_grid)
n_data_points = sin_wave.shape[0]
n_samples = n_data_points - T - output_dim
raw_X = []
for i in range(0, n_samples):
    raw_X.append(sin_wave[i : i + T + output_dim])

np.random.shuffle(raw_X)
X_test = raw_X[:test_set_size]
raw_X = raw_X[test_set_size:]
No major changes here. THe only thing is that in the plot_tests method, we need to fetch the X and y tensors from the GPU to the CPU and then cast to a numpy array (.cpu().numpy()).
def get_tensors(l):
    X = []
    y = []
    for x_y in l:
        X.append(x_y[:T])
        y.append(x_y[T:])

    X = torch.FloatTensor(X)
    y = torch.FloatTensor(y)
    return X, y

X, y = get_tensors(raw_X)
X_test, y_test = get_tensors(X_test)
PyTorch models operate on tensors instead of numpy objects. so, we cast the lists of lists to 2-D tensors. If we wanted to break things up into batches, this is where we’d do it (they’d be 3-D tensors).
device = "cuda" if torch.cuda.is_available() else "mps" if torch.backends.mps.is_available() else "cpu"
print(f"Using {device} device")
Here we are just checking to see if we’re going ot be on the CPU or the GPU. On my machine, it’s on the graphics card.
# Define model
class NeuralNetwork(Module):
    def __init__(self):
        super().__init__()
        self.flatten = Flatten()
        self.rnn_stack = Sequential(
            RNNCell(T, hidden_dim, bias=False, nonlinearity='tanh'),
            Linear(hidden_dim, output_dim, bias=False)
        )

    def forward(self, x):
        x = self.flatten(x)
        logits = self.rnn_stack(x)
        return logits

model = NeuralNetwork().to(device)
loss_fn = HuberLoss(delta=alpha)
optimizer = torch.optim.SGD(model.parameters(), lr=eps)
All the work we did earlier to define the matrices, initialize them, and define the algorithms and loss function… done. The only difference here from our earlier implementation is that we’re using a tanh non-linearity instead of the sigmoid. This is a pretty minor change. It should not change the quality of the fit, but will change the values for the parameters. We could go back to our earlier implementation and update it for a more direct comparison.
Model components:
- RNNCell - the input and hidden matrices (
UandW). - Linear - the
Vmatrix - Sequential - a container for model layers.
Optimization components:
- Huber loss - A scaled version of our earlier loss function. smoothly goes to zero at the origin and linear outside of
delta. - SGD - Stochastic Gradient Descent with all the bells and whistles.
def predict_test_set(model):
    model.eval()
    with torch.no_grad():
        X, y = X_test.to(device), y_test.to(device)
        pred = model(X)
    return pred
This is how we get our predictions out of the model. We turn the grad off so that that is does not accumulate and contribute to the optimization.
def train(step, X, y):
    model.train()

    X, y = X.to(device), y.to(device)

    # Compute prediction error
    pred = model(X)
    loss = loss_fn(pred, y)

    # Backpropagation
    optimizer.zero_grad()
    loss.backward()
    optimizer.step()

    if step % 100 == 0:
        loss = loss.item()
        print(f"loss: {loss:>7f}")
        plot_tests(step)
In the training loop the model is put into train() mode. This makes sure that gradient tracking is on. Then we put X and y onto the GPU. After computing the predictions and loss, we use it to backprop. optimizer.zero_grad() zeros out the gradient, loss.backward() propogates the loss into the gradients for the parameters, optimizer.step() updates the parameters.
for step in range(n_epochs):
    train(step, X, y)

plot_tests(step)
print("Done!")
The main loop is super simple. Iterate over epochs and then done!
Optimization
The optimization process looks about the same as the numpy code, but takes far less wall clock time.
Conclusions
The optimization here is orders of magnitude faster. Writing the code was orders of magnitude faster. Working with PyTorch feels a bit like cheating.
Other references
Strahinja Zivkovic has a nice PyTorch RNN tutorial
The PyTorch Tutorial is easily modified for other model types and loss functions.